 You heard it. One of Firebase Cloud Messaging‘s biggest weaknesses was its inability to send messages inside the app. If the user had their app open, chances are the message wouldn’t even show up.
Now in comes Firebase In-App Messaging. The service that allows you to do… exactly that!
One of the best parts is that its piss easy to implement. You add the dependency and the rest is on the Firebase Console. This also means the marketing people can create the message themselves without getting the team’s engineers involved.
In-App Messages can also be one-time or recurring. Messages can be tailored and sent to different user segments as well.
I’m sure you can think of the numerous marketing and user engagement applications of this service which we are actually going to briefly list here on ericdecanini
A Few Use Ideas
- Sending promotions and sales
- Ensuring they see important updates
- Encouraging users to make purchases in your app
- Inviting a friend to use the app
- Subscribing to a service
Implementing it in your app
// Add the In-App Messaging depencency:
implementation 'com.google.firebase:firebase-inappmessaging-display:17.0.0'

// Check that your Firebase dependency is up-to-date:
implementation 'com.google.firebase:firebase-core:16.0.1'
Add this to your app-level build.gradle file.
After that, run your app once and visit the logcat to get your app’s Instance ID.
I/FIAM.Headless: Starting InAppMessaging runtime with Instance ID YOUR_APP_ID
You’ll need to copy this into the Firebase Console later for testing on your device.
Building (and Testing) the Message in the Console
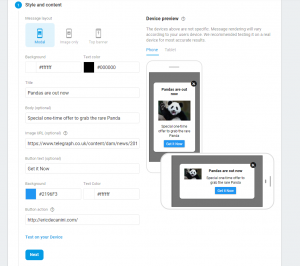
 You know the drill. You go to the Firebase Console > In-App Messaging and you’ll be able to build and style the message, schedule it, target it to your user segments, and send it.
When you build the message, you’ll probably want to test it. There’s a button that says Test on your Device and there, you paste the Instance ID you copied earlier. After clicking test and waiting for the pop-up saying “Campaign is ready for testing”, close your app and open it again. Your In-App Message should display on startup.
It’s noteworthy that one of the errors I ran through that caused the message not to display was including an image that was too large. Use small images for good success.